When launching the Data Import into List from the List Start page via the Import Data button in the toolbar or from the Data tab in a list via the Import data into list button, the following wizard guides you through the definition of a one-time import that can be converted into a scheduled Data Import when needed..
Following is explained in this topic:
Define the import options
1. The Import Data Dialog is displayed:

2. Start by entering the properties for the file import:
- List — By default the current list is selected when the dialog is called from a list. When the dialog is opened from the List Start page, you can still select a list here.
- Create new segment — Toggle this option if data needs to be imported into a new static segment. When activated, a segment name and API name must be provided.
Note: If this Import Dialog is called from a static segment's Data tab, the name is already entered and cannot be changed.
When importing into a list or segment that contains already records, you must define what needs to happen on import.
On Import
- Insert new records and update existing records (only for import into lists, not segments).
- Only insert new records — Existing records are not updated.
- Only update existing records — No new records are inserted (only for import in lists, not segments).
- Delete existing records — Only when a match is found with a record on the list, the record is deleted. No other records are updated or inserted.
On Duplicate Data (only for lists, not segments)
- import first match — If duplicate records are found in the input source, only the first record matching an existing list record is used in the import. Any subsequent matches are skipped.
- import last match — If duplicate records are found in the input source, the last record matching an existing list record is used in the import.
On Error- means what to do when encountering a failure.
- Stop and don't import anything— Aborts the whole import.
- Continue the import— Skips the current record but imports the remaining records.
Examples of failure:
* wrong data type
* data that doesn't make sense (eg. 2021-02-31)
File options
Select file — Click Select file to browse for the file to import or drop a file onto the section.
Note: The maximum file size is set to 4 MB.
Note: If the source file contains a BOM, an error arises and the import will not be able to read the file.
To set the file properties, click the pencil icon. Following options are displayed:
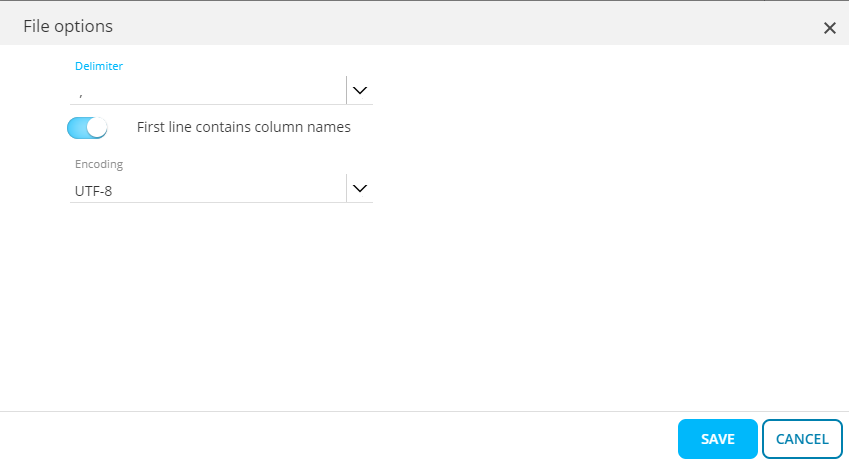
- Delimiter — Select the delimiter used in the file. You can choose from following: TAB, comma, semi-colon, or pipe.
- Use text quotes — It is possible to wrap text with double quotes. Select the option if you want this.
- First line contains column names — Activate this option if the first line of the import file contains the column names.
- Encoding — Set the type of encoding applied to the file.
3. When you have finished setting the file properties, click Save . The properties are summarized and the Next button is available.
Match fields from the source file with fields on the list
4. Click Next to go to the Field matching tab:
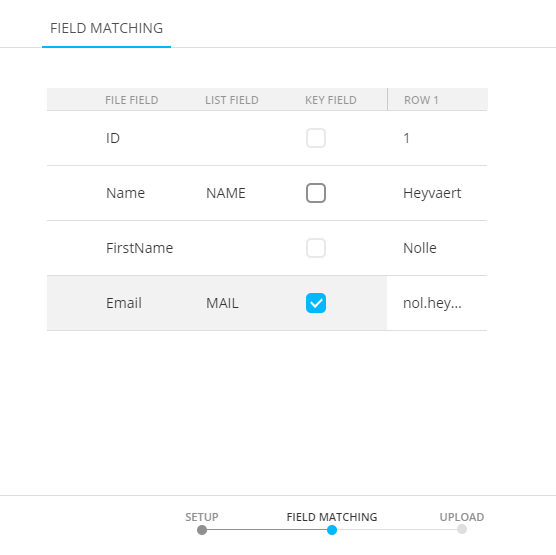
All fields in the import file are listed in the first column. If possible, they are automatically mapped onto the fields on the selected list based on the column names.
5. If no default mapping is provided, select the field on the list manually from the drop-down list. Each field on the target list can only be mapped once.
Note: Not all fields in the source input need to be mapped to fields in the list.
6. Finally, indicate the fields that are used as key field. This key field is used to link a record in the import file to a record on the list.
Note: You can select more than one field as key field. However, if the ID field is selected as a key field, no other fields can be used as a key field because the ID field is the primary key.
Moreover, if the ID field is selected as a key field, records can only be updated, and not inserted. This implies that if no IDs in the input source match any IDs currently in the selected list, no changes will take place.
Longtext fields can never be used as key field.
7. When you have finished defining the key fields, click Next.
Import the data
The import is launched automatically. Depending on the error handling options, the import will either stop or continue when en error occurs.
When the import is finished, a summary of the result is listed.

Note: If problems occur during import, such as the text in the import file being too long for the destination field, the import fails and the user is alerted of the issue.
Save the import
When the import has finished, you can choose to create the import configuration as a recurring Data Import.

If you need to import this data frequently, you have the ability to create a scheduled Data Import. In that case click the button Create recurring Data Import. This takes you straight to the Data Import wizard.
Information from the one-time data import will be pre-filled in the recurring Data Import wizard. This includes:
- The list name in which the data is imported - This list cannot be modified anymore
- Import options - These options can still be modified
- Selected file type and delimiter - These options can still be changed at this point
- Field mapping and key fields - Note that all fields in the source must be mapped to fields in the list.
For more details on setting up a Data Import, check out the topic Create Data Import.
